Site-to-Site VPN NAT Exempt
Site-to-Site VPN NAT Exempt
Before we are going to talk about the Site to site VPN NAT Exempt, we need to know what exactly is NAT Exempt and Where we can use NAT Exempt
⭐ What is NAT Exempt ?
NAT exemption is a firewall or VPN configuration that permits specified traffic to bypass the NAT process. In other words, the device does not translate the private IP address in the communication over a VPN tunnel.
⭐ Where we can use NAT Exempt ?
In the case of site to site VPN, When you have a VPN connection between two networks, you might want the devices on each network to be able to communicate with each other using their private IP addresses. NAT exemption allows this to happen.
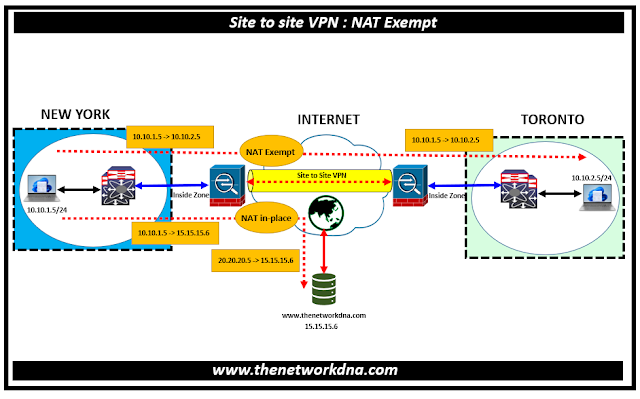
Fig 1.1- Site-to-Site VPN NAT Exempt
Consider the example as shown above, which shows a site-to-site tunnel connecting the New York and Toronto offices. For traffic that you want to go to the Internet (for example from 10.10.1.5 in New York to www.thenetworkdna.com), you need a public IP address provided by NAT to access the Internet.
However, for traffic that you want to go over the VPN tunnel (for example from 10.10.1.5 in New York to 10.10.2.5 in Toronto), you do not want to perform NAT; you need to exempt that traffic by creating an identity NAT rule. Identity NAT translates an address to the same address.
Lets go the set of configurations on Cisco Defense Orchestrator for this scenario
⭐ Cisco Defense Orchestrator Configurations for NAT Exempt
⭐Step 1: In the Cisco Defense Orchestrator navigation bar at the left, click Objects > FDM Objects. Click FTD > Network
⭐Step 2: Identify the New York inside network. Enter an object name, In the Value section Select eq and enter a single IP address or a subnet address expressed in CIDR notation.
⭐Step 3: Identify the Toronto inside network. Enter an object name, In the Value section Select eq and enter a single IP address or a subnet address expressed in CIDR notation.
⭐Step 4: Configure manual identity NAT for the New York network when going over the VPN to Toronto on Firewall FA1.
⭐Step 5: Navigate to Inventory and use the filter to find the device for which you want to create the NAT rule. Now navigate to Management area of the details panel, click NAT
- In section 1, select Static. Click Continue
- In section 2, select Source Interface = inside and Destination Interface = outside. Click Continue.
- In section 3, select Source Original Address = 'newyork-network' and Source Translated Address = 'newyork-network'. and Select Use Destination.
- Select Destination Original Address = 'toronto-network' and Source Translated Address = 'toronto-network'. Note: Because you do not want to translate the destination address, you need to configure identity NAT for it by specifying the same address for the original and translated destination addresses. Leave all of the port fields blank. This rule configures identity NAT for both source and destination.
⭐Step 6: Select Disable proxy ARP for incoming packets and save.
⭐Step 7: Configure manual dynamic interface PAT when going to the Internet for the inside New York network on Firewall FA1
- Click + on Twice NAT
- In section 1, select Dynamic. Click Continue.
- In section 2, select Source Interface = inside and Destination Interface = outside. Click Continue.
- In section 3, select Source Original Address = 'newyork-network' and Source Translated Address = 'interface'. Save it
⭐Step 8 : Deploy configuration changes to CDO and you are done.
Continue Reading...
- Security: Cisco ASA Vs Cisco FTD - The Network DNA
- Site-to-Site VPN: IPSEC Tunnel Between an ASA and a Cisco IOS Router
- Cisco Security: Cisco ASA 5505 Interfaces configuration for Access Ports
- Cisco Security: Cisco ASA 5505 Interfaces configuration for Trunk Port
- Cisco ASA Series 1: Restoring the ASA to Factory Default Configuration
- Cisco ASA Series 2: Configuring NAT
- Cisco ASA Series 3: Easy VPN Remote
- Cisco ASA Series 4: Configuring VLANs and Sub interfaces
- Cisco ASA Series 5: Configuring Threat Detection
- Site to Site IPSec VPN Tunnel between Cisco ASA and Palo Alto Firewalls


