
Site to Site IPSec VPN Tunnel between Cisco ASA and Palo Alto Firewalls
Site to Site IPSec VPN Tunnel
Cisco ASA and Palo Alto Firewalls
We are going to talk about the IPsec VPN tunnel between Palo Alto Firewall and Cisco ASA Firewall where one site is protected by a Cisco ASA, while another is protected by a Palo Alto Firewall.
We are configuring the tunnel between each site, avoiding overlapping subnets, so that a secure tunnel may be formed with the required security profiles applied.
 |
| Fig 1.1- Site to Site IPSec Tunnel ASA to PA |
Cisco-ASA-5505 Site to Site configuration through ASDM
Step 1: Login to the ASDM through your web window. Once opened, check for Wizards and select option "IPsec VPN Wizard". Once selected, Choose Site-to-Site for the IPSec VPN Tunnel type, and click Next
 |
| Fig 1.2- ASDM Wizard |
Step 2: Specify the outside IP address of the remote peer which is the IKE gateway. As shown below, you need to configure the IP address of the Peer (which is a Palo Alto Firewall) and Pre-shared key which will be same on the other end.
By default the Tunnel Group Name will be your outside IP address. Click Next.
 |
| Fig 1.3- ASDM Wizard |
Step 3: Specify the attributes for phase 1 negotiation. These must be the same on both the Palo Alto Firewall and Cisco ASA. Click Next. Specify the attributes to use for Phase 2 negotiation. These attributes must match on both the Palo Alto Firewall and the Cisco ASA.
We have also selected PFS. PFS stands for Perfect Forwarding Secrecy
 |
| Fig 1.4- ASDM Wizard |
Step 4: The network or hosts that should be permitted to have their traffic travel through the VPN tunnel we are going to create should be specified. You must give the Local Networks and Remote Networks for the VPN Tunnel in this stage.
To choose the local network address from the drop-down menu, click the button next to Local Networks as shown above.
Step 5: Choose Local Networks and Remote Networks and click OK. Click Add button and add the Remote Networks. After choosing the Local and Remote Networks click Next
 |
| Fig 1.5- ASDM Wizard |
Step 6: This summary shows the properties that the VPN Wizard defined. After double-checking the options, click Finish when you are certain that they are accurate.
Note: Select connection profiles under Site-to-Site VPN's Configuration tab to see the local network and distant network that are secured by the VPN tunnel that we set up.
By default, the wizard sets up the Firewall Access Rules. Additionally, a static route has been set up to connect to the single network behind the Palo Alto Firewall.
Palo Alto PA Firewall Site to Site configuration
Route-based IPSec VPNs are implemented by PAN-OS. The tunnel interface uses the IPSec tunnel to transport VPN traffic. To do this, a logical tunnel interface must be built. The security zone must be tied to the tunnel interface.
For the VPN connections, we must build zones.
Step 1: To create Zones, Navigate to Network > Zones
Provide the details like Name, Log Setting, Type and save.
 |
| Fig 1.6- Palo Alto Configs |
Step 2: For Palo Alto Firewall and Cisco ASA devices with two LAN layers, we will generate the Address Object. To create Object, Navigate Object> Addresses
Provide the details like Name, Type and save
 |
| Fig 1.7- Palo Alto Configs |
Step 3: Now as you created the object, we need to create the interface tunnel. To create Navigate to Network> Interface> Tunnel.
Provide the details like interface Name, Virtual Router, Security Zone and save.
 |
| Fig 1.8- Palo Alto Configs |
Step 4: Now create virtual routers .To create Navigate to Network > Virtual Routers> click ADD.
 |
| Fig 1.9- Palo Alto Configs |
Now you need to add the Static routes as shown below
Add Static Routes > IPv4
 |
| Fig 2.0- Palo Alto Configs |
Step 5: Create IKE Crypto Phrase 1 for the VPN connection.
Navigate to Network> IKE Crypto Profile
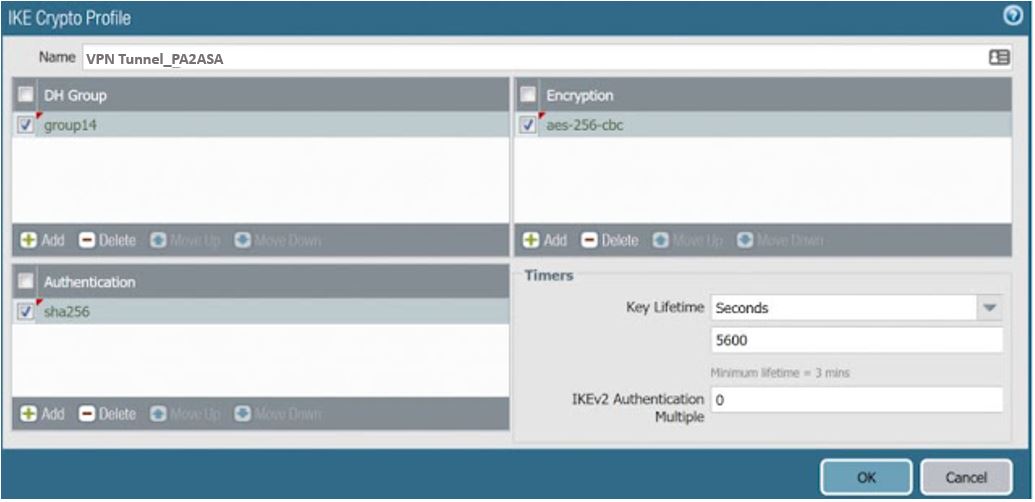 |
| Fig 2.1- Palo Alto Configs |
Step 6: Similarly, create IPsec Crypto
Navigate to Network > IPSec Crypto and click Add.
Step 7: Create IKE Gateways
Navigate to Network> IKE Gateways and click Add.
 |
| Fig 2.2- Palo Alto Configs |
Step 8: Create IPsec Tunnels
Navigate to Network> IPSec Tunnels and press Add.
You can also add the proxy ID with the Local and Remote Network address
 |
| Fig 2.3- Palo Alto Configs |
Step 9: Create Policy. Navigate to Policies > Security and click Add.
Configure the multiple tabs here like General, Source, Destination and Action
Continue Reading..
++++++++++++++++++++++++++++++++++++++++++++++++++++
IPsec site-to-site VPN tunnel between Cisco ASA & FortiGate Firewall - The Network DNA
Site-to-Site VPN: IPSEC Tunnel Between an ASA and a Cisco IOS Router - The Network DNA
Site-to-Site IPsec VPN Tunnel with two FortiGate Firewalls - The Network DNA
Security: FortiGate to SonicWall VPN Tunnel setup - The Network DNA
The Network DNA : Security
++++++++++++++++++++++++++++++++++++++++++++++++++++


