Cisco ASA Series 4: Configuring VLANs and Sub interfaces
Cisco ASA Series 4: Configuring VLANs and Sub interfaces
Cisco ASA is a security appliance that incorporates a firewall, antivirus software, intrusion detection, and a virtual private network (VPN). It allows for proactive threat defense, preventing attacks from propagating over the network.
On a physical interface, Cisco ASA firewalls support multiple 802.1q VLANs. This implies that an administrator may setup numerous logical interfaces (subinterfaces) on a single physical interface and allocate each to a different VLAN. A Cisco firewall appliance with four physical interfaces, for example, is not restricted to four security zones.
For example, we might construct three logical subinterfaces on each physical interface, resulting in 12 (4x3) distinct security zones (12 VLANs and 12 Layer 3 subnets). Up to 1024 VLANs can be configured on a single ASA model (the ASA 5585-X supports 1024 VLANs).
 |
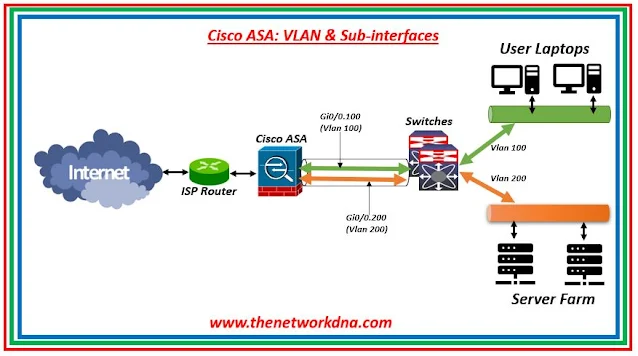
| Fig 1.1- Cisco ASA: VLAN & Sub-interfaces |
If you setup subinterfaces (VLANs) on a physical interface, that physical interface must be linked to a Trunk Port on a Layer 2 switch. Furthermore, if you allow subinterfaces, you normally do not want the primary physical interface to be carrying traffic as well. You may accomplish this by missing the nameif command (no nameif) on the physical interface.
To configure logical subinterfaces, use the subinterfaces parameter of the interface command in global configuration mode. This will place you in subinterfaces configuration mode, where you must assign a VLAN ID with the vlan id command.
⭐Related : Cisco ASA/ASDM Upgrade procedure
Assume that we intended to divide our internal network into two security zones (Inside1 and Inside2). Inside1 zone may host all user PCs, whereas Inside2 zone may host all internal corporate servers (email server, domain server, and so on). To construct this architecture, we must create two VLANs (100 and 200) on the switch, one for each network subnet. Instead of utilizing two ASA firewall physical interfaces (one for each zone), we utilized one physical interface and two logical interfaces.
- G0/0 : Physical Interface
- G0/0.100 : sub interface assigned to VLAN 100
- G0/0.200 : sub interface assigned to VLAN 200
Physical Interface
NDNA_CiscoASA(config)# interface gigabitethernet 0/0
NDNA_CiscoASA(config-if)# no nameif
NDNA_CiscoASA(config-if)# no security-level
NDNA_CiscoASA(config-if)# no ip address
NDNA_CiscoASA(config-if)# exit
VLAN 100 Subinterface
NDNA_CiscoASA(config)# interface gigabitethernet 0/0.100
NDNA_CiscoASA(config-subif)# vlan 100
NDNA_CiscoASA(config-subif)# nameif inside1
NDNA_CiscoASA(config-subif)# security-level 70
NDNA_CiscoASA(config-subif)# ip address 10.10.10.1 255.255.255.0
VLAN 200 Subinterface
NDNA_CiscoASA(config)# interface gigabitethernet 0/1.200
NDNA_CiscoASA(config-subif)# vlan 200
NDNA_CiscoASA(config-subif)# nameif inside2
NDNA_CiscoASA(config-subif)# security-level 90
NDNA_CiscoASA(config-subif)# ip address 10.10.20.1 255.255.255.0
Continue Reading...
- Security: Cisco ASA Vs Cisco FTD - The Network DNA
- Site-to-Site VPN: IPSEC Tunnel Between an ASA and a Cisco IOS Router
- Cisco Security: Cisco ASA 5505 Interfaces configuration for Access Ports
- Cisco Security: Cisco ASA 5505 Interfaces configuration for Trunk Port
- Cisco ASA Series 1: Restoring the ASA to Factory Default Configuration
- Site to Site IPSec VPN Tunnel between Cisco ASA and Palo Alto Firewalls


