
Cisco Meraki to Azure Site to Site VPN
Cisco Meraki to Azure Site to Site VPN
A site-to-site VPN connection allows communication between two remote locations over the internet as if they were connected by a private network. It enables secure network communication and access between branch offices, remote workers, and data centers.
It is frequently utilized by major corporations and organizations with various locations.
Site-to-Site VPN between Azure and Meraki MX is a VPN connection that allows communication between a network in Microsoft Azure and a network in a Meraki MX security appliance.
 |
| Fig 1.1- Site to Site tunnel Azure & Cisco Meraki |
To set up this VPN, you will need to:
- Create a Virtual Network Gateway in Azure.
- Configure the Meraki MX security appliance with the VPN settings.
- Create a connection between the Virtual Network Gateway and Meraki MX.
Azure VPN Gateway & S2S tunnel
Step 1: Enter "Virtual Network Gateway" in the section labelled "Search the Marketplace" on the Azure site. Select the entry for Virtual network gateway after finding it in the search return. Select Create on the Virtual Network Gateway page.
The Create Virtual Network Gateway page is then displayed.
 |
| Fig 1.2- Azure Portal |
Following the specification of the IP address of the on-premises VPN device to which you will establish a connection, you give the site a name that Azure may use to identify it.
Additionally, you provide the IP address prefixes that will be sent to the VPN device through the VPN gateway.
Step 2: Create a Local network Gateway in the Azure
Navigate to Home --> Search for Local Network Gateway and you will get below
 |
| Fig 1.3- Azure Portal |
Your on-premises network's address prefixes are the ones you choose. You may simply edit the numbers later if your on-premises network changes or you need to alter the public IP address for the VPN device.
Between your virtual network gateway and your on-premises VPN device, establish a Site-to-Site VPN connection.
Step 3: Navigate to the gateway by going to Name of your VNet -> Overview -> Connected devices -> Name of your gateway.
 |
| Fig 1.4- Azure Portal |
These are the settings on the Azure side, Now lets create a site-to-site profile in the Cisco Meraki and make a tunnel there.
Cisco Meraki Site to Site tunnel
Step 1: Login to the Cisco Meraki portal and check for the S2S-Azure network and select site-to-site VPN as shown below
 |
| Fig 1.5- Meraki Portal |
Step 2: Once you selected, select the below as hub location for your deployment
 |
| Fig 1.6- Meraki Portal |
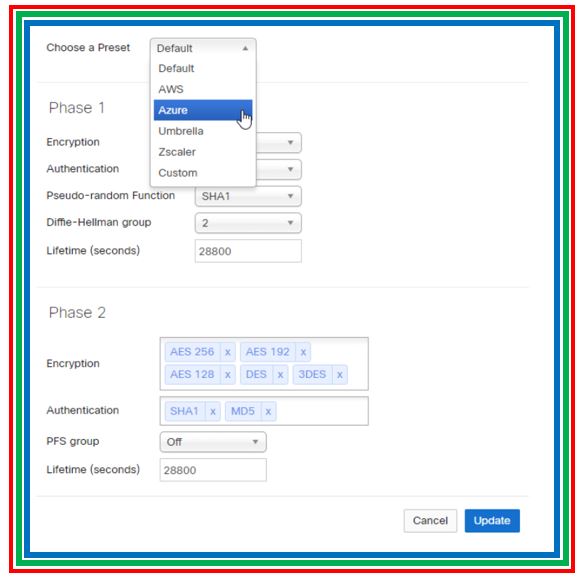
Step 3: As you are going to use Meraki MX device to create the tunnel with the Azure Gateway. you need to put the same shared key that you specify when creating your Site-to-Site VPN connection.
Select the below one as you are setting up tunnel with Azure
 |
| Fig 1.7- Meraki Portal |
Step 4: On the Non-Meraki VPN peers, configure details settings.
 |
| Fig 1.8- Meraki Portal |
The public IP address of the gateway for your virtual network. Using the CLI, PowerShell, or Azure portal, you may view the public IP address. Go to Virtual network gateways and click the name of your gateway to obtain the Public IP address of your VPN gateway using the Azure portal.
Continue Reading..
++++++++++++++++++++++++++++++++++++++++++++++++++++IPsec site-to-site VPN tunnel between Cisco ASA & FortiGate Firewall - The Network DNA
IPsec site-to-site VPN tunnel between Palo Alto Firewall & FortiGate Firewall - The Network DNA
Site-to-Site VPN: IPSEC Tunnel Between an ASA and a Cisco IOS Router - The Network DNA
Site-to-Site IPsec VPN Tunnel with two FortiGate Firewalls - The Network DNA
Security: FortiGate to SonicWall VPN Tunnel setup - The Network DNA
The Network DNA : Security
++++++++++++++++++++++++++++++++++++++++++++++++++++


