PaloAlto Networks: Factory reset on a Palo Alto Networks device
Factory reset on a Palo Alto Networks device
Today we are going to talk about the procedure of the factory reset on a Palo Alto Networks device in case of unrecoverable Software Failure.
With these nine steps you will be above to reset the device in the factory reset and then you can restore the last known configuration from the external server where daily backups are stored.
Let's go with the steps now
Step 1: Connect the Console cable, which is provided by Palo Alto Networks, from the "Console" port to a computer, and use a terminal program (9600, 8, n, 1) to connect to the Palo Alto Networks device.
Step 2: Power on to reboot the device.
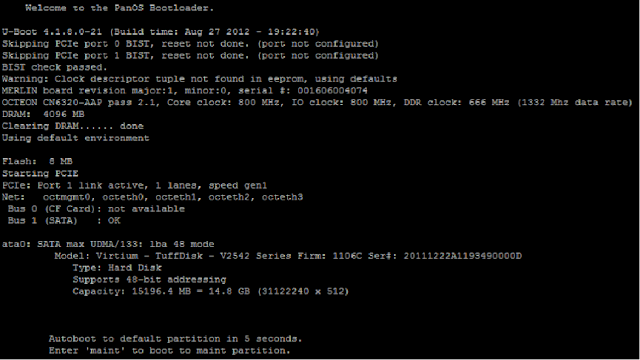
Step 3: During the boot sequence, the screen should look like this:
Step 4: Type maint to enter maintenance mode.
Step 5: PAN-OS 7.1 NOTE: When performing this on PAN-OS 7.1, you will see a "CHOOSE PANOS" screen with the following options: PANOS (maint-other), PANOS (maint) or PANOS (sysroot0). Please choose PANOS (maint). Press enter to continue.
Step 6:Once in maintenance mode, the following is displayed, please press enter to Continue:
Step 7: Arrow down to Factory Reset and press Enter to display the menu
Step 8: You will see the Image that will be used to perform the factory reset. Select Factory Reset and press Enter again
Step 9: The unit will reboot when complete. Please be aware that it may take several minutes before the auto commit to complete and allow the admin/admin login to work properly.
Once the device has been factory reset, you must now restore the configuration from backup.
Continue Reading...
- The Battle of the Data Transports: Ethernet vs MPLS
- MPLS VPN with Carrier Supporting Carrier
- How to Optimize Your MPLS VPN with OSPF Sham-Link
- Introduction to EVPN Control Plane
- MPLS LDP Graceful Restart (GR) - The Network DNA
- MPLS LDP Loop Detection - The Network DNA
- MPLS Label advertisement modes - The Network DNA
- MPLS LDP Basic Concepts - The Network DNA
- Talk about MPLS LSP - The Network DNA


