
How to Generate a Self-Signed Web Certificate for Cisco vManage
Cisco SD-WAN · vManage Administration · TechNote
Step-by-step guide to renewing or replacing an expired vManage web certificate using OpenSSL and a self-signed Root CA — no third-party CA required.
www.thenetworkdna.com | Updated: September 9, 2024 | ⏱ 8 min read
When the web certificate on your Cisco vManage expires, you may lose access to the GUI entirely or be greeted with a persistent, non-dismissable alarm. Because Cisco does not sign web certificates for on-premises SD-WAN deployments, customers must obtain a certificate either from their own internal Certificate Authority (CA), a third-party CA, or — as this guide demonstrates — generate and install a self-signed certificate using OpenSSL.
Table of Contents
- Introduction & Background
- Problem: Expired vManage Web Certificate
- Solution Overview
- Step-by-Step: Generate & Install Self-Signed Certificate
- Verify the New Certificate
- Related Information & Resources
1. Introduction & Background
Cisco vManage is the centralised management plane for the Cisco SD-WAN (Software-Defined Wide Area Network) solution. Like any web-based management interface, vManage uses a TLS/SSL web certificate to secure browser sessions. These certificates have a defined expiry date, and when they expire, access to the vManage GUI is degraded or blocked.
For on-premises vManage deployments, Cisco does not act as the signing authority for web certificates. Customers are responsible for obtaining a certificate from one of the following sources:
- Their own internal/corporate Certificate Authority (CA)
- A trusted third-party CA (e.g., DigiCert, Sectigo, GlobalSign)
- A self-signed certificate generated locally on the vManage using OpenSSL
This guide focuses on the third option — the self-signed approach — which is the fastest and simplest way to resolve an expired certificate situation when internal or third-party CA access is not immediately available.

2. Problem: Expired vManage Web Certificate
⚠️ Symptom
The vManage web certificate is expiring or has already expired. As a result, you may lose access to the vManage Graphical User Interface (GUI) or see a permanent, non-dismissable alarm within the GUI about the expired certificate.
An expired vManage web certificate causes browsers to display security warnings and may prevent login entirely, depending on the browser's certificate enforcement policies. In production SD-WAN environments, this directly impacts the ability to monitor, configure, and manage the WAN fabric through the GUI. Resolving this quickly is critical to maintaining operational visibility.
3. Solution Overview
If you are not concerned about the security implications of using a self-signed certificate and simply want to eliminate the alarm and restore vManage GUI access, you can follow the procedure described in this document to generate and install a new self-signed certificate.
High-level workflow:
Phase 1 — Capture
Note the existing certificate Subject values from the vManage GUI.
Phase 2 — Generate CSR
Use the vManage GUI to generate a new Certificate Signing Request (CSR) using the captured Subject values.
Phase 3 — Sign with OpenSSL
Save the CSR on vManage, generate a self-signed Root CA key and certificate, then sign the CSR to produce a new web certificate.
Phase 4 — Import & Verify
Import the signed certificate back into vManage and confirm the new expiry date is updated successfully.
4. Step-by-Step: Generate & Install Self-Signed Certificate
Follow these twelve steps carefully and in order. All CLI commands are run from the vManage vshell.
Step 1Capture the Existing Certificate Subject
In the vManage GUI, navigate to Administration > Settings > Web Server Certificate > Certificate and record the full Subject field. You will need these values when generating the CSR in the next step.
Example Subject value:
CN=vmanage, OU=Cisco SDWAN, O=Cisco Systems, L=San Jose, ST=CA, C=US
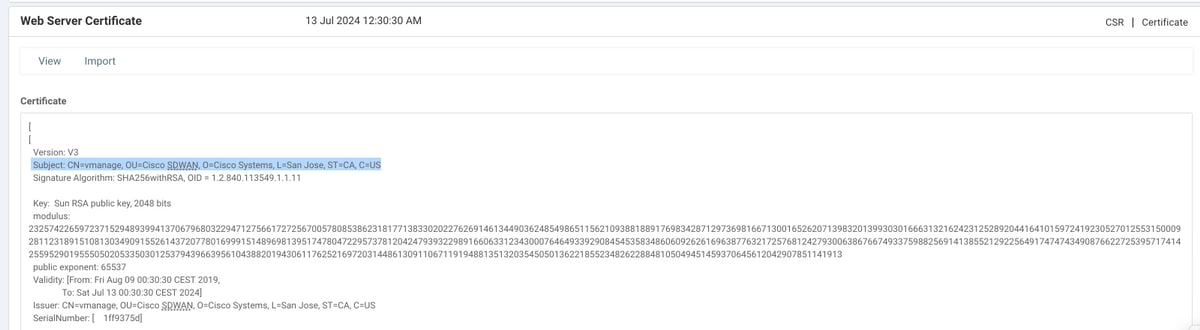
Figure 1 — vManage Web Server Certificate subject information in Administration > Settings
Step 2Generate a New Certificate Signing Request (CSR)
In the vManage GUI, navigate to Administration > Settings > Web Server Certificate > CSR and click Generate. Enter the exact same values from the Subject field captured in Step 1 — Country, State, City, Organisation, Organisational Unit, and Common Name must all match.
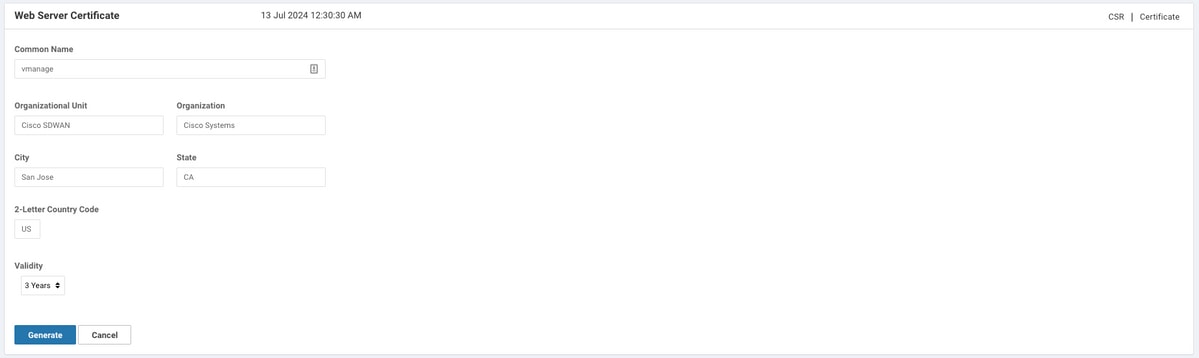
Figure 2 — Generate New Certificate Signing Request (CSR) with Subject values from Step 1
Step 3Copy the CSR to Your Clipboard
After the CSR is generated, the full PEM-encoded CSR block is displayed on screen — beginning with -----BEGIN NEW CERTIFICATE REQUEST----- and ending with -----END NEW CERTIFICATE REQUEST-----. Select and copy the entire block to your clipboard.
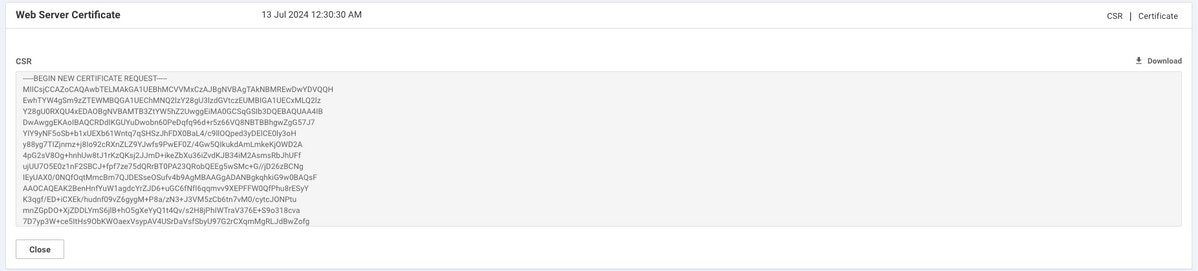
Figure 3 — Copy the complete CSR block from the vManage interface
Step 4Save the CSR into a File on vManage
Enter the vManage vshell and use the echo command to paste the CSR contents into a file. Create a working directory named web first to keep all certificate files organised.
vmanage# vshell
vmanage:~$ mkdir web
vmanage:~$ cd web
vmanage:~/web$ echo "-----BEGIN NEW CERTIFICATE REQUEST-----
> MIICsjCCAZoCAQAwbTELMAkGA1UEBhMCVVMxCzAJBgNVBAgTAkNBMREwDwYDVQQH
> EwhTYW4gSm9zZTEWMBQGA1UEChMNQ2lzY28gU3lzdGVtczEUMBIGA1UECxMLQ2lz
> Y28gU0RXQU4xEDAOBgNVBAMTB3ZtYW5hZ2UwggEiMA0GCSqGSIb3DQEBAQUAA4IB
> DwAwggEKAoIBAQCRDdIKGUYuDwobn60PeDqfq96d+r5z66VQ8NBTBBhgwZgG57J7
> YIY9yNF5oSb+b1xUEXb61Wntq7qSHSzJhFDX0BaL4/c9llOQped3yDElCE0ly3oH
> ...
> -----END NEW CERTIFICATE REQUEST-----" > web_cert.csr
Note: Paste your actual CSR content from the clipboard — replace the truncated ... shown above with the full base64 block generated in Step 2/3. Ensure the BEGIN and END header lines are included exactly as shown.
Step 5Verify the CSR Was Saved Correctly
Use the cat command to display the CSR file and confirm the full certificate request block is intact — both the header and footer lines must be present and the base64 content must not be truncated.
vmanage:~/web$ cat web_cert.csr
-----BEGIN NEW CERTIFICATE REQUEST-----
MIICsjCCAZoCAQAwbTELMAkGA1UEBhMCVVMxCzAJBgNVBAgTAkNBMREwDwYDVQQH
EwhTYW4gSm9zZTEWMBQGA1UEChMNQ2lzY28gU3lzdGVtczEUMBIGA1UECxMLQ2lz
Y28gU0RXQU4xEDAOBgNVBAMTB3ZtYW5hZ2UwggEiMA0GCSqGSIb3DQEBAQUAA4IB
...
nal67+T/QWgLSJB2pQuPHo51MbA55w==
-----END NEW CERTIFICATE REQUEST-----
vmanage:~/web$
Step 6Generate the Root CA Private Key
Use OpenSSL to generate a 2048-bit RSA private key for your Root CA. This key will be used to sign both the Root CA certificate and the CSR. The output file is named rootca.key.
vmanage:~/web$ openssl genrsa -out rootca.key 2048
Generating RSA private key, 2048 bit long modulus
..
..........
e is 65537 (0x10001)
vmanage:~/web$ ls
rootca.key web_cert.csr
vmanage:~/web$
The 2048-bit key length provides a strong security baseline. The ls output confirms both the key and CSR are in the working directory.
Step 7Generate the Self-Signed Root CA Certificate
Generate the Root CA certificate (rootca.pem), self-signed using the key created in Step 6. When prompted, enter the same Distinguished Name (DN) values as captured from the vManage certificate Subject in Step 1. Set the validity period to 4000 days to avoid near-term re-expiry.
vmanage:~/web$ openssl req -x509 -new -nodes -key rootca.key -sha256 -days 4000 -out rootca.pem
You are about to be asked to enter information that will be incorporated
into your certificate request.
...
Country Name (2 letter code) [AU]:US
State or Province Name (full name) [Some-State]:CA
Locality Name (eg, city) []:San Jose
Organization Name (eg, company) [Internet Widgits Pty Ltd]:Cisco Systems
Organizational Unit Name (eg, section) []:Cisco SDWAN
Common Name (e.g. server FQDN or YOUR name) []:vmanage
Email Address []:
vmanage:~/web$ ls
rootca.key rootca.pem web_cert.csr
vmanage:~/web$
Important: The highlighted values above must match the Subject captured in Step 1 exactly. Any mismatch between the Root CA certificate fields and the CSR subject can cause certificate validation issues.
Step 8Sign the CSR with the Root CA Certificate
Sign your CSR (web_cert.csr) using the Root CA certificate (rootca.pem) and Root CA private key (rootca.key). The output is the signed web certificate named web_cert.crt, also valid for 4000 days.
vmanage:~/web$ openssl x509 -req -in web_cert.csr -CA rootca.pem -CAkey rootca.key \
-CAcreateserial -out web_cert.crt -days 4000 -sha256
Signature ok
subject=/C=US/ST=CA/L=San Jose/O=Cisco Systems/OU=Cisco SDWAN/CN=vmanage
Getting CA Private Key
vmanage:~/web$ ls
rootca.key rootca.pem rootca.srl web_cert.crt web_cert.csr
vmanage:~/web$
The message "Signature ok" confirms the signing operation completed successfully. The rootca.srl serial file is also created automatically by OpenSSL.
Step 9Copy the Signed Certificate to Your Clipboard
Use cat to display the signed certificate file, then select and copy the entire output — from -----BEGIN CERTIFICATE----- to -----END CERTIFICATE----- — to your clipboard. You will paste this into the vManage GUI in Step 10.
vmanage:~/web$ cat web_cert.crt
-----BEGIN CERTIFICATE-----
MIIDVjCCAj4CCQDXH8GlDhvL4DANBgkqhkiG9w0BAQsFADBtMQswCQYDVQQGEwJV
UzELMAkGA1UECAwCQ0ExETAPBgNVBAcMCFNhbiBKb3NlMRYwFAYDVQQKDA1DaXNj
byBTeXN0ZW1zMRQwEgYDVQQLDAtDaXNjbyBTRFdBTjEQMA4GA1UEAwwHdm1hbmFn
...
20aYK4S0K0nTkpscuVIrXHkwNN6Ka4q9/rVxnLzAflJ4E9DXojpD3qNH
-----END CERTIFICATE-----
Step 10Import the Certificate into vManage
In the vManage GUI, navigate to Administration > Settings > Web Server Certificate > Import. Paste the entire certificate content copied in Step 9 into the import field and click Import.
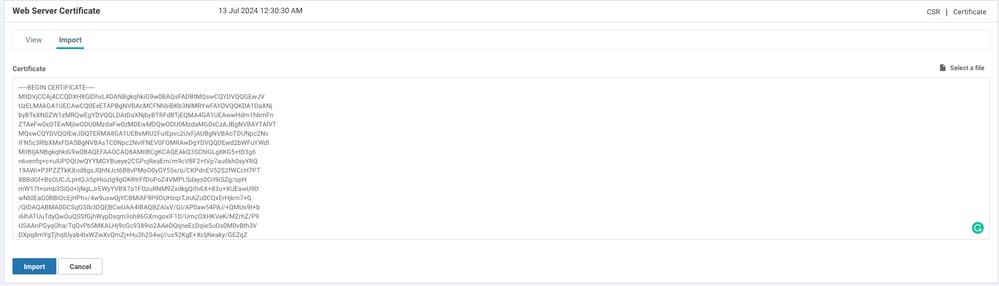
Figure 4 — Paste the signed certificate PEM content into the vManage Import Certificate panel
Step 11Confirm Certificate Installation Success
If the import was successful, vManage displays the "Certificate Installed Successfully" confirmation message. If you see an error instead, double-check that the CSR Subject values match the Root CA DN fields entered in Step 7.

Figure 5 — vManage confirms "Certificate Installed Successfully"
5. Verify the New Certificate
The final step is to confirm that the new certificate is active and showing the updated validity period. Navigate back to Administration > Settings > Web Server Certificate > Certificate and verify that the expiry date has been updated to reflect the 4000-day validity set during signing.
Step 12✅ Verify Certificate Validity Date Updated
Check the certificate details to confirm the new expiry date is correctly displayed. The alarm about the expired certificate should now be cleared, and vManage GUI access should be fully restored.

Figure 6 — Certificate validity date updated successfully — installation complete
OpenSSL Command Quick Reference
The table below summarises all three OpenSSL commands used in this procedure for quick reference.
| Step | Purpose | Command | Output File |
|---|---|---|---|
| 6 | Generate Root CA private key | openssl genrsa -out rootca.key 2048 | rootca.key |
| 7 | Generate self-signed Root CA cert | openssl req -x509 -new -nodes -key rootca.key -sha256 -days 4000 -out rootca.pem | rootca.pem |
| 8 | Sign CSR with Root CA | openssl x509 -req -in web_cert.csr -CA rootca.pem -CAkey rootca.key -CAcreateserial -out web_cert.crt -days 4000 -sha256 | web_cert.crt |
6. Related Information & Resources
For more information on OpenSSL commands used in this guide and general Cisco SD-WAN documentation, refer to the following resources.
- OpenSSL Manual Pages — openssl.org
- Technical Support & Documentation — Cisco Systems
- Cisco SD-WAN Product Support Page
Summary
Generating and installing a self-signed web certificate on Cisco vManage is a straightforward twelve-step process that combines the vManage GUI for CSR generation and certificate import with OpenSSL commands run from the vManage vshell. The entire process takes under 10 minutes and does not require access to an external CA.
For production environments where browser security warnings from self-signed certificates are unacceptable, consider replacing this solution with a certificate issued by a trusted internal or commercial CA. For lab environments, monitoring systems, or urgent operational recovery scenarios, this self-signed approach is an effective and quick resolution.
Tags:
Cisco vManage Self-Signed Certificate Cisco SD-WAN OpenSSL TLS Certificate Renewal Web Server Certificate CSR Generation Root CA vManage GUI Access
Content and images sourced from Cisco TAC Technical Note — Document ID 215103 (cisco.com). All product names, screenshots, and configuration commands are the property of Cisco Systems, Inc. This article is for educational purposes only.


