
Cisco ISE — Configuring TACACS+ Authentication for Device Administration
Cisco ISE › Device Administration › TACACS+ Configuration

April 8, 2023 | ✍ www.thenetworkdna.com — WIRES AND WI.FI | ⏱ 12 min read | ISE 3.1 • IOS-XE 17.6.4 • Device Admin License
TACACS+ has been the go-to protocol for network device access control in large networks for a long time — and for good reason. The ability to define exactly which commands a person can run, right down to specific arguments, is something RADIUS simply doesn’t offer. This guide walks through a complete Cisco ISE TACACS+ setup: from enabling the Device Admin service to verifying command authorization in live logs.
In This Guide
1. Introduction & Lab Environment
2. Enable Device Admin Service on PSN Nodes
3. Configure General TACACS+ Settings
4. Add a Network Device for TACACS+
5. Configure a TACACS Profile
6. Configure TACACS Command Sets
7. Configure the Device Admin Policy Set
8. Switch / Router AAA Configuration
9. Verification
10. FAQ
1. Introduction & Lab Environment
Centralizing control over network device access using TACACS+ has been standard practice in large enterprise networks for years. The protocol lets you define granular, command-level permissions — something RADIUS doesn’t do natively. You can build simple policies for a handful of admins, or complex rule sets that specify exactly what a junior helpdesk employee can type into a CLI session.
This guide sets up two distinct access levels:
| User Type | Access Level |
| Administrator (Employee group) | Full access — any command permitted |
| Helpdesk (Helpdesk group) | Limited access — show, ping, traceroute, logout, exit only |
Lab environment used:
• Cisco ISE version 3.1, Patch 5 — Device Administration license active
• Cisco Catalyst C9200L-48P-4X running IOS-XE 17.6.4
⚠ Using RADIUS instead?
If your use case doesn’t require command-level authorization, RADIUS is simpler to configure. See: Cisco ISE — Configuring RADIUS Authentication for Device Administration.
2. Enable Device Admin Service on PSN Nodes
The Device Admin service isn’t enabled by default. Before anything else, it needs to be turned on at the Policy Service Node (PSN) level. You’ll do this once per PSN.
Navigation Path
Work Centers > Administration > System > Deployment > [Select PSN Node]
Select the PSN node, scroll down to Policy Service, check the box for “Enable Device Admin Service”, and click Save. Repeat this on every PSN that will serve as a TACACS+ server.
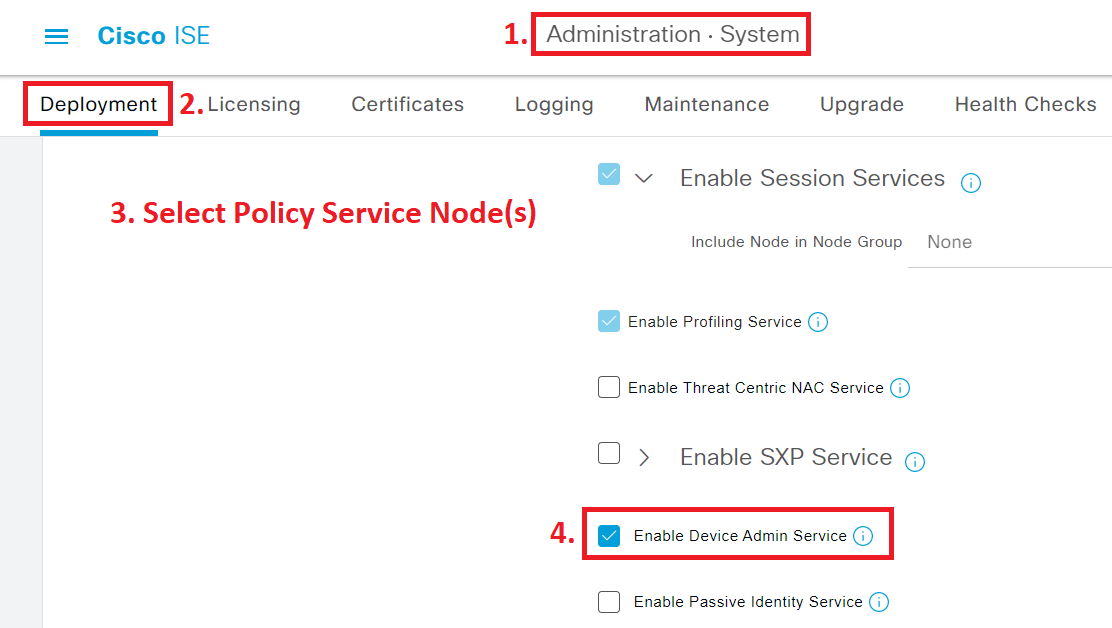
Figure 1 — Enabling the Device Admin Service on the ISE PSN node
3. Configure General TACACS+ Settings
Navigation Path
Work Centers > Device Administration > Settings > Connection Settings
The Connection Settings page lets you configure session timeouts and — more usefully — custom Username and Password prompts. These prompts appear when an admin logs into a TACACS+-enabled device. Setting them to something recognizable (like “TAC-User” and “TAC-Pass”) makes it immediately obvious which login prompt is TACACS+.

Figure 2 — Custom TACACS+ prompt visible during a Telnet session
Heads-up on Custom Prompts
The custom Username prompt only works over Telnet. SSH handles the username field differently and won’t display it. The custom Password prompt works for both Telnet and SSH.
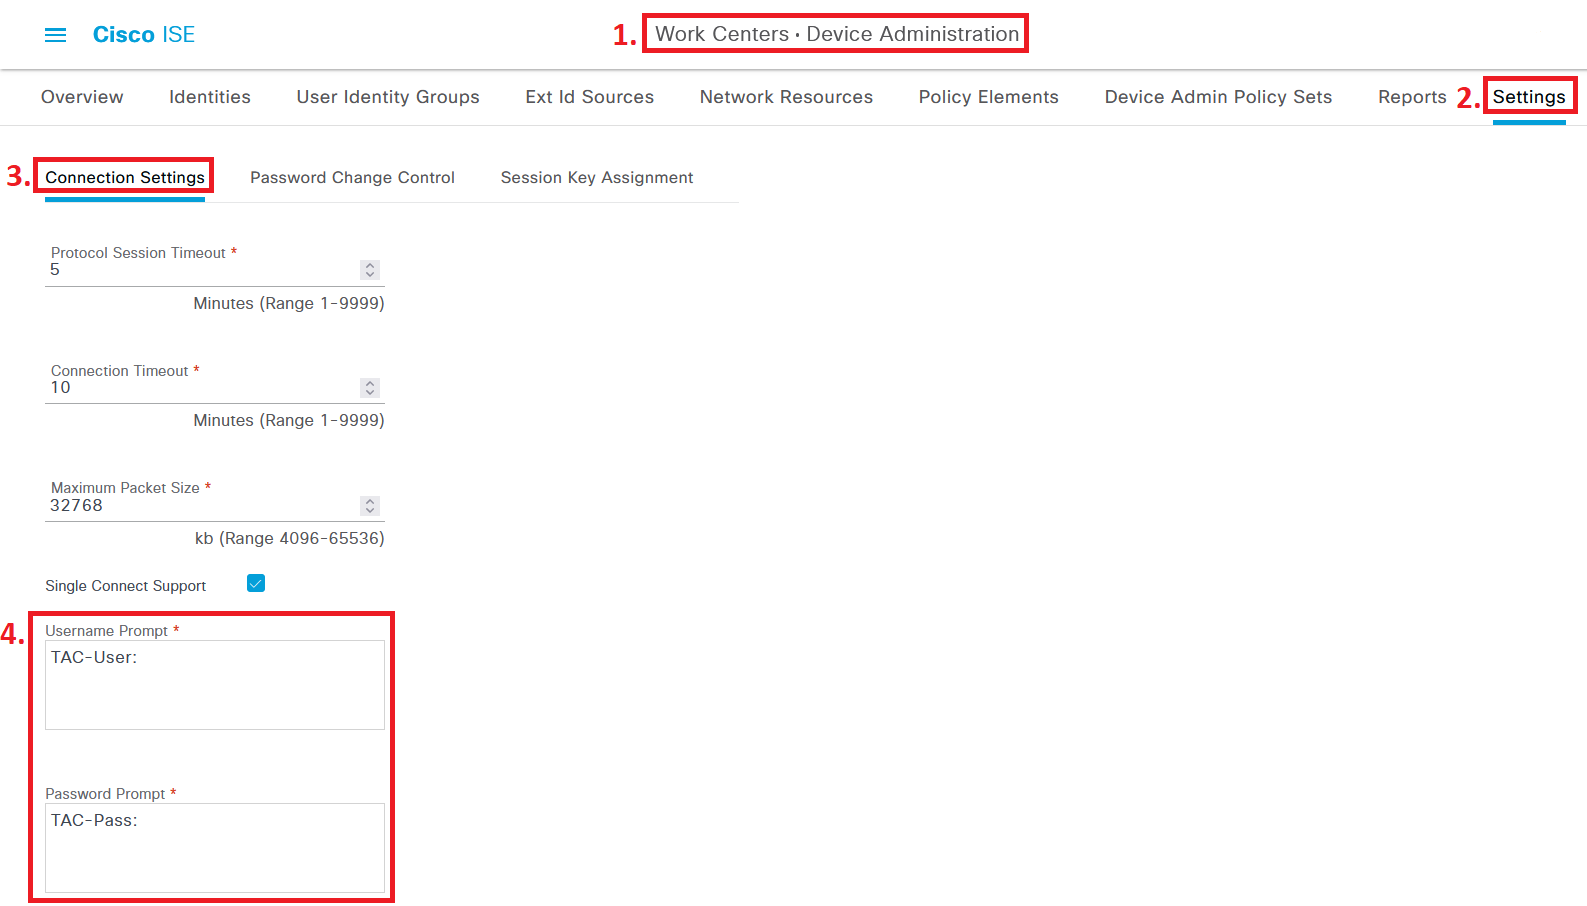
Figure 3 — Configuring custom Username and Password prompts in ISE Connection Settings
Under the Password Change Control tab, you can choose to enable or disable Telnet Password Change. Despite the name, this works for SSH sessions too.
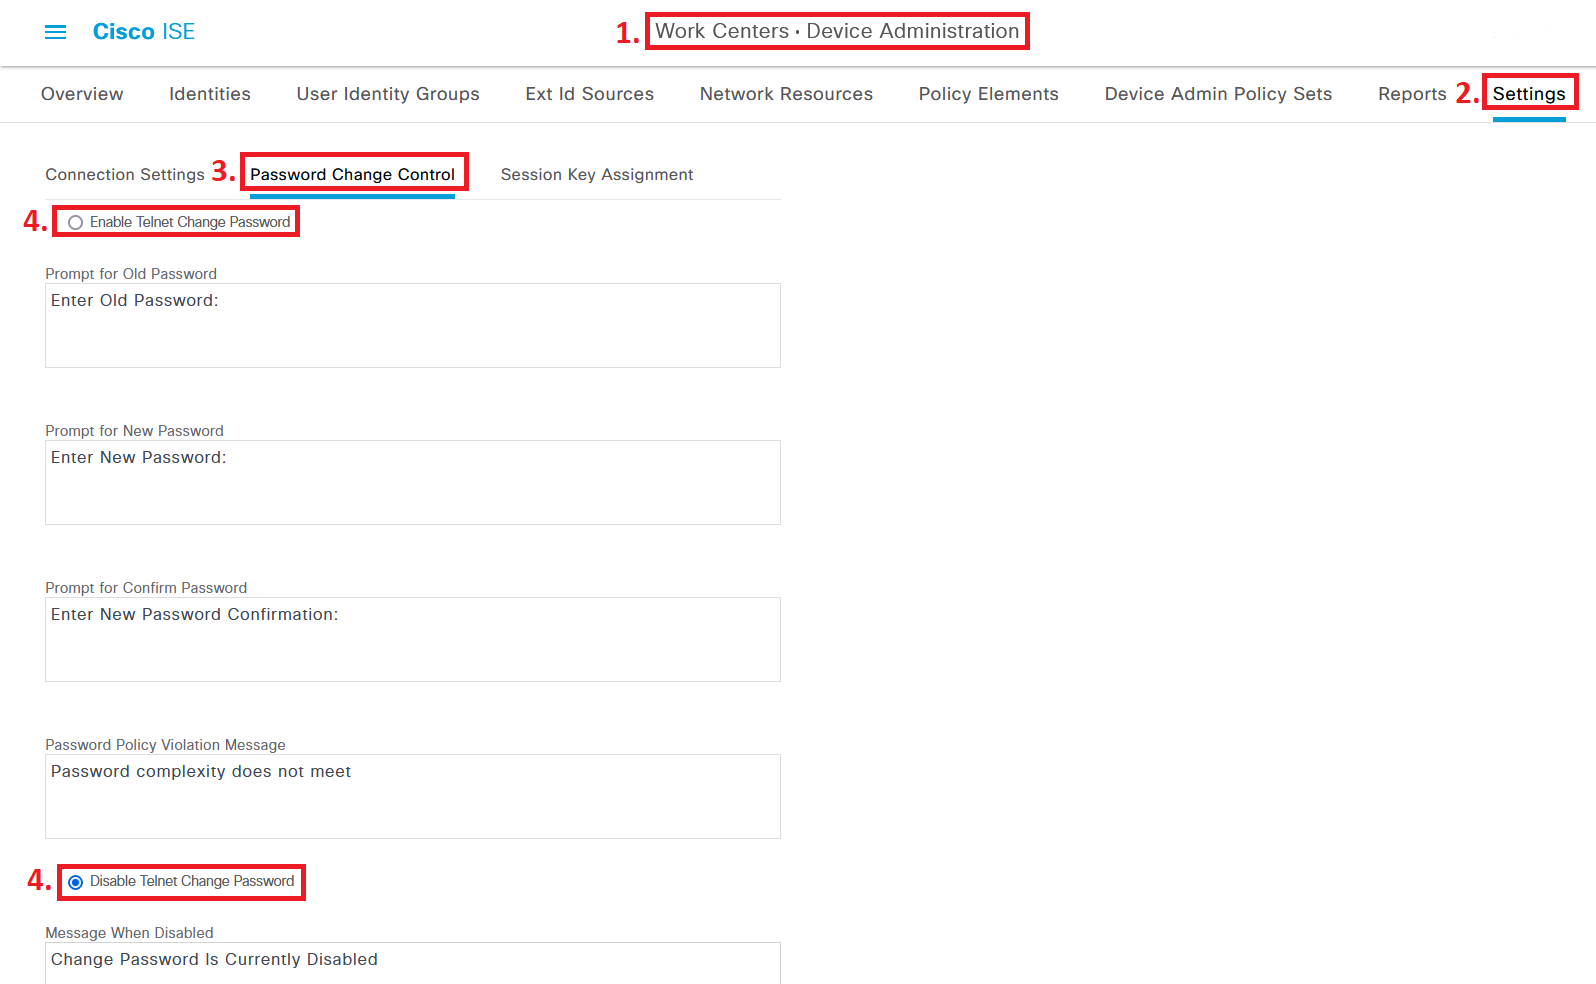
Figure 4 — Password Change Control tab in ISE TACACS+ settings
When password change is enabled, trigger it by connecting to a TACACS+-enabled device and entering a blank password. ISE will prompt for a password change from there.

Figure 5 — Password change prompt triggered by blank password entry
Active Directory note: If ISE is joined to an AD, you may need to configure additional AD settings to let the new password sync back to Active Directory. Depending on your organization’s password sync setup, you might want to leave this feature disabled entirely.
4. Add a Network Device for TACACS+
Navigation Path
Administration > Network Resources > Network Devices > Network Devices
Add or edit a network device. Give it a hostname and IP address, then check the box for TACACS Authentication Settings. Set a Shared Secret here — write it down, you’ll enter the same value into the switch later.
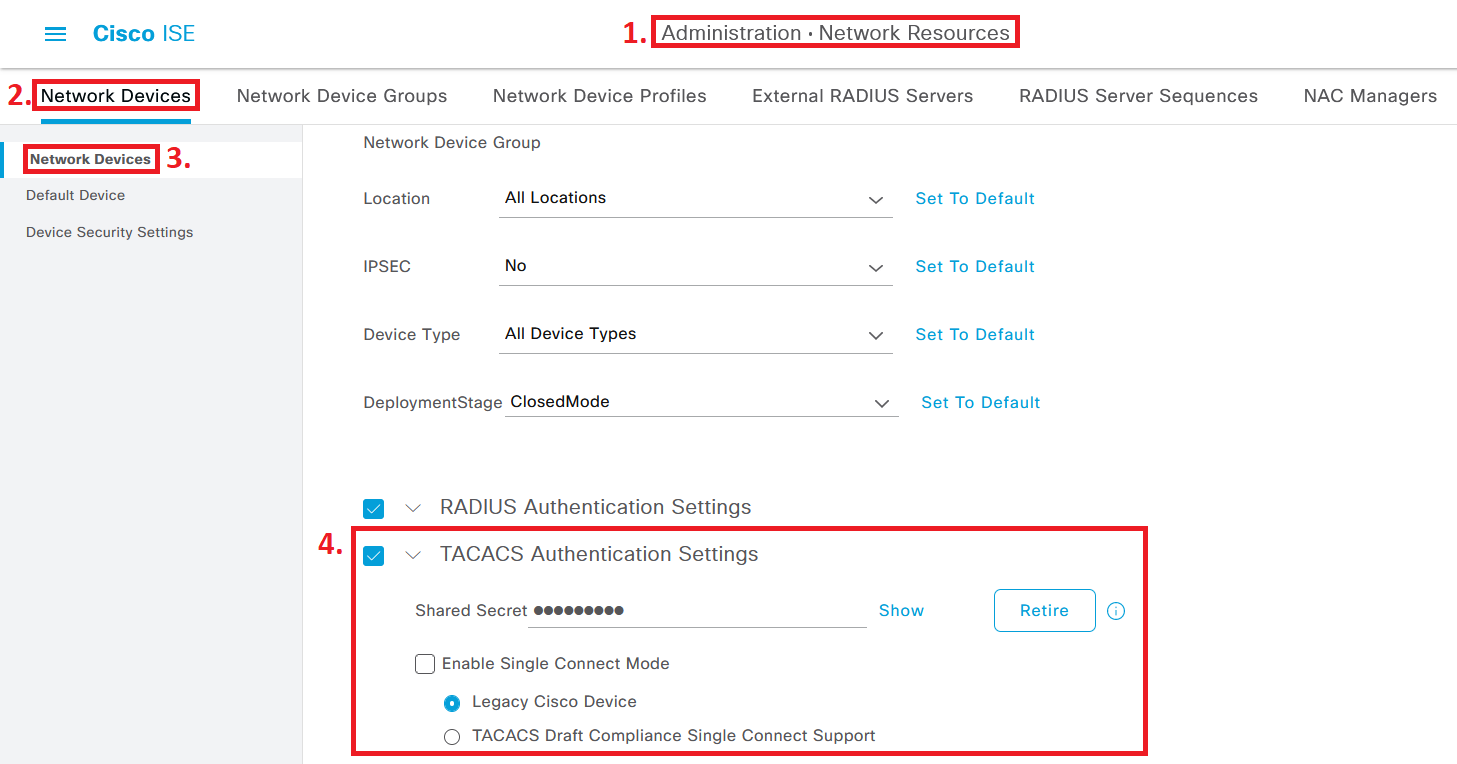
Figure 6 — Network Device configuration with TACACS+ Authentication Settings enabled
Click Save when done. Any device you want to authenticate against ISE via TACACS+ needs this same treatment.
5. Configure a TACACS Profile
Navigation Path
Work Centers > Device Administration > Policy Elements > Results > TACACS Profiles
Click Add and name the profile something clear — “TAC_PROFILE_PRIV15” works well. Set both Default Privilege and Maximum Privilege to 15.
You might wonder why Helpdesk users get privilege 15 if they’re supposed to have limited access. The reason: some common “show” commands — like show running-config — actually require privilege 15 to execute. Privilege level alone isn’t granular enough. The real control comes from Command Sets in the next section.
For timeouts, 60 minutes for the session timeout and 15 minutes for idle timeout is a reasonable starting point. If your NMS or monitoring system keeps persistent sessions, you may want to leave the timeout field blank.
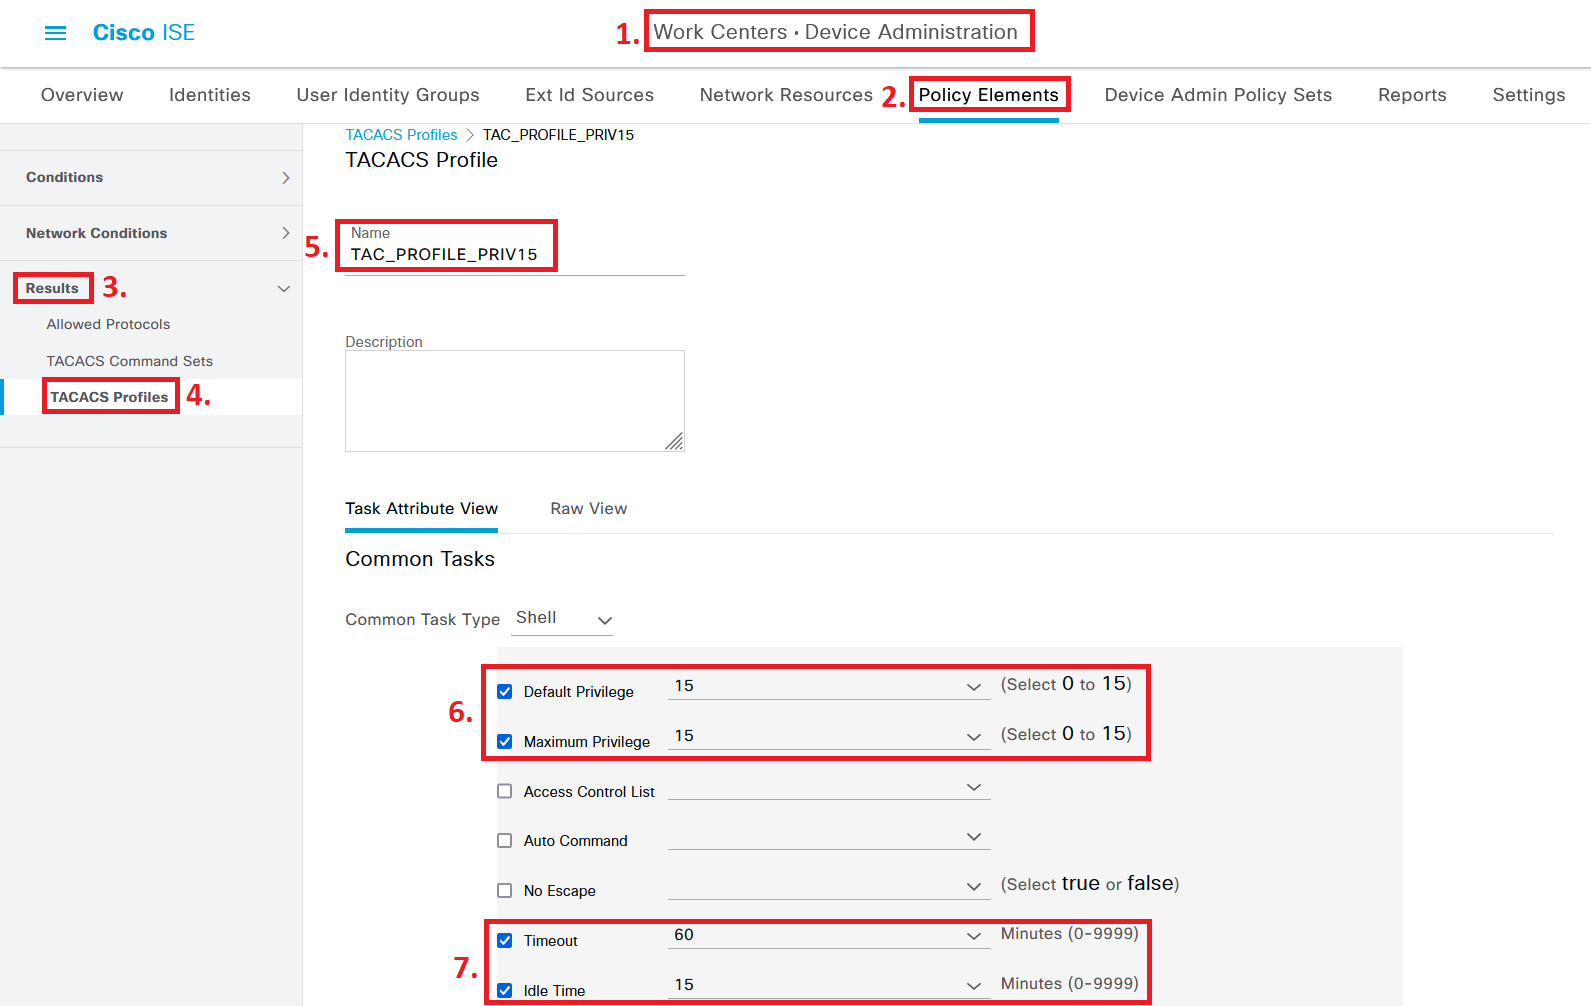
Figure 7 — TACACS Profile “TAC_PROFILE_PRIV15” with privilege level 15 and session timeouts configured
6. Configure TACACS Command Sets
Navigation Path
Work Centers > Device Administration > Policy Elements > Results > TACACS Command Sets
Two Command Sets are needed: one for Administrators and one for Helpdesk. This is where the real access control lives.
6a. PermitAllCommands — For Administrators
Click Add and name this Command Set “PermitAllCommands”. The only setting needed here is to check the box for “Permit any command that is not listed below”. That’s it — Administrators can run anything.
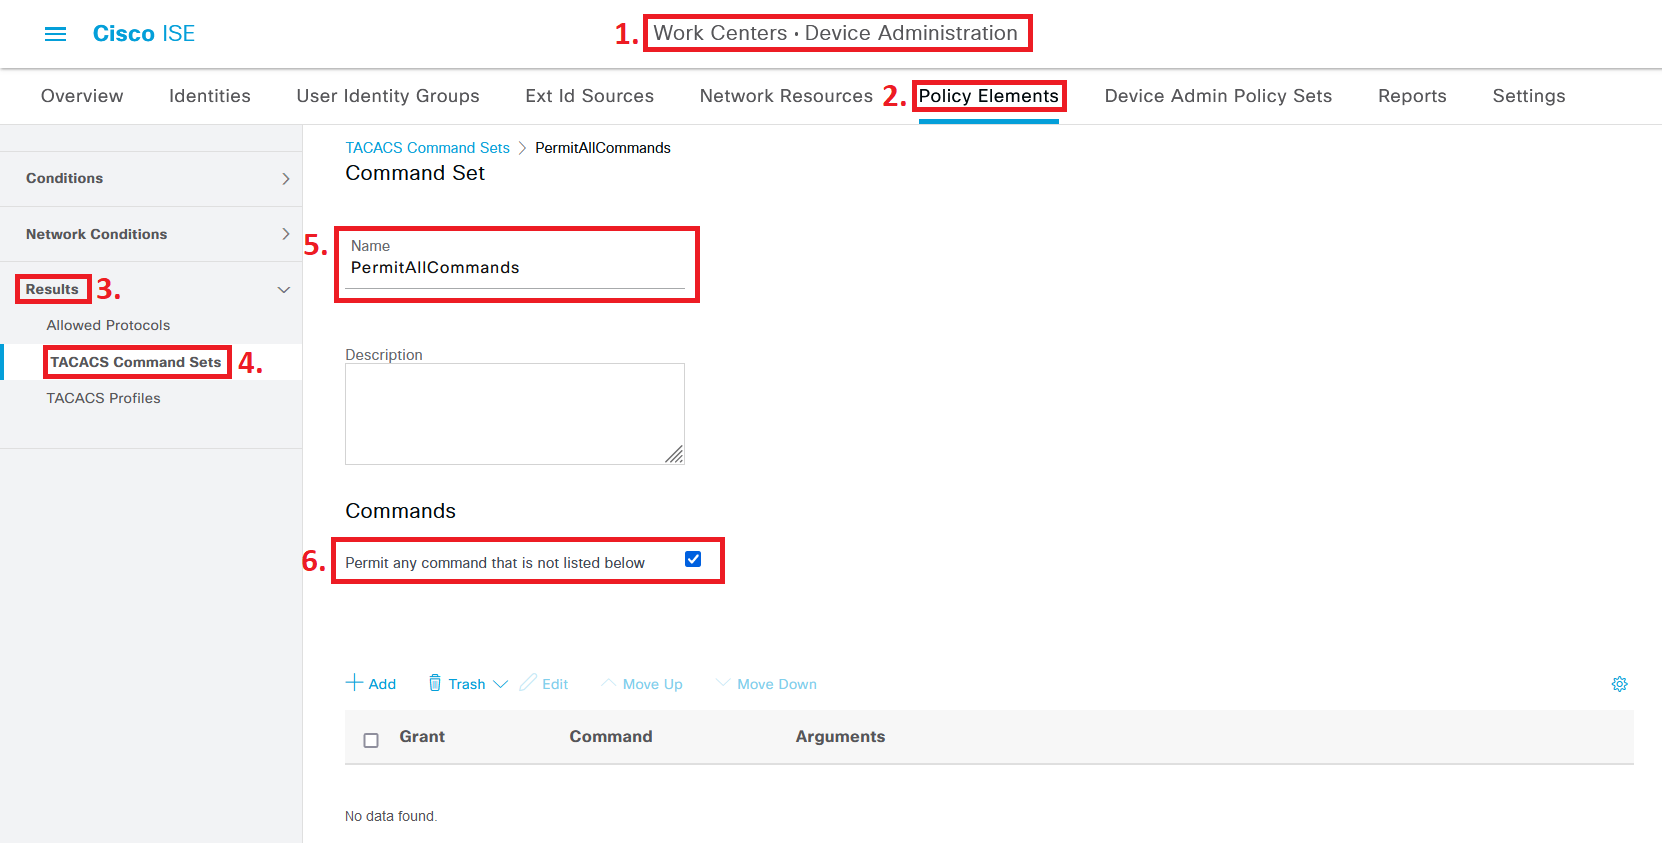
Figure 8 — PermitAllCommands TACACS Command Set for Administrator accounts
6b. PermitBasicCommands — For Helpdesk
Go back to TACACS Command Sets and click Add again. Name this one “PermitBasicCommands”. This time, don’t check the permit-any box. Instead, use the Add button to add permitted commands one by one.
The configuration below permits all show commands (with any arguments), along with ping, traceroute, logout, and exit. Leaving the Arguments field blank for a command means all arguments for that command are permitted.
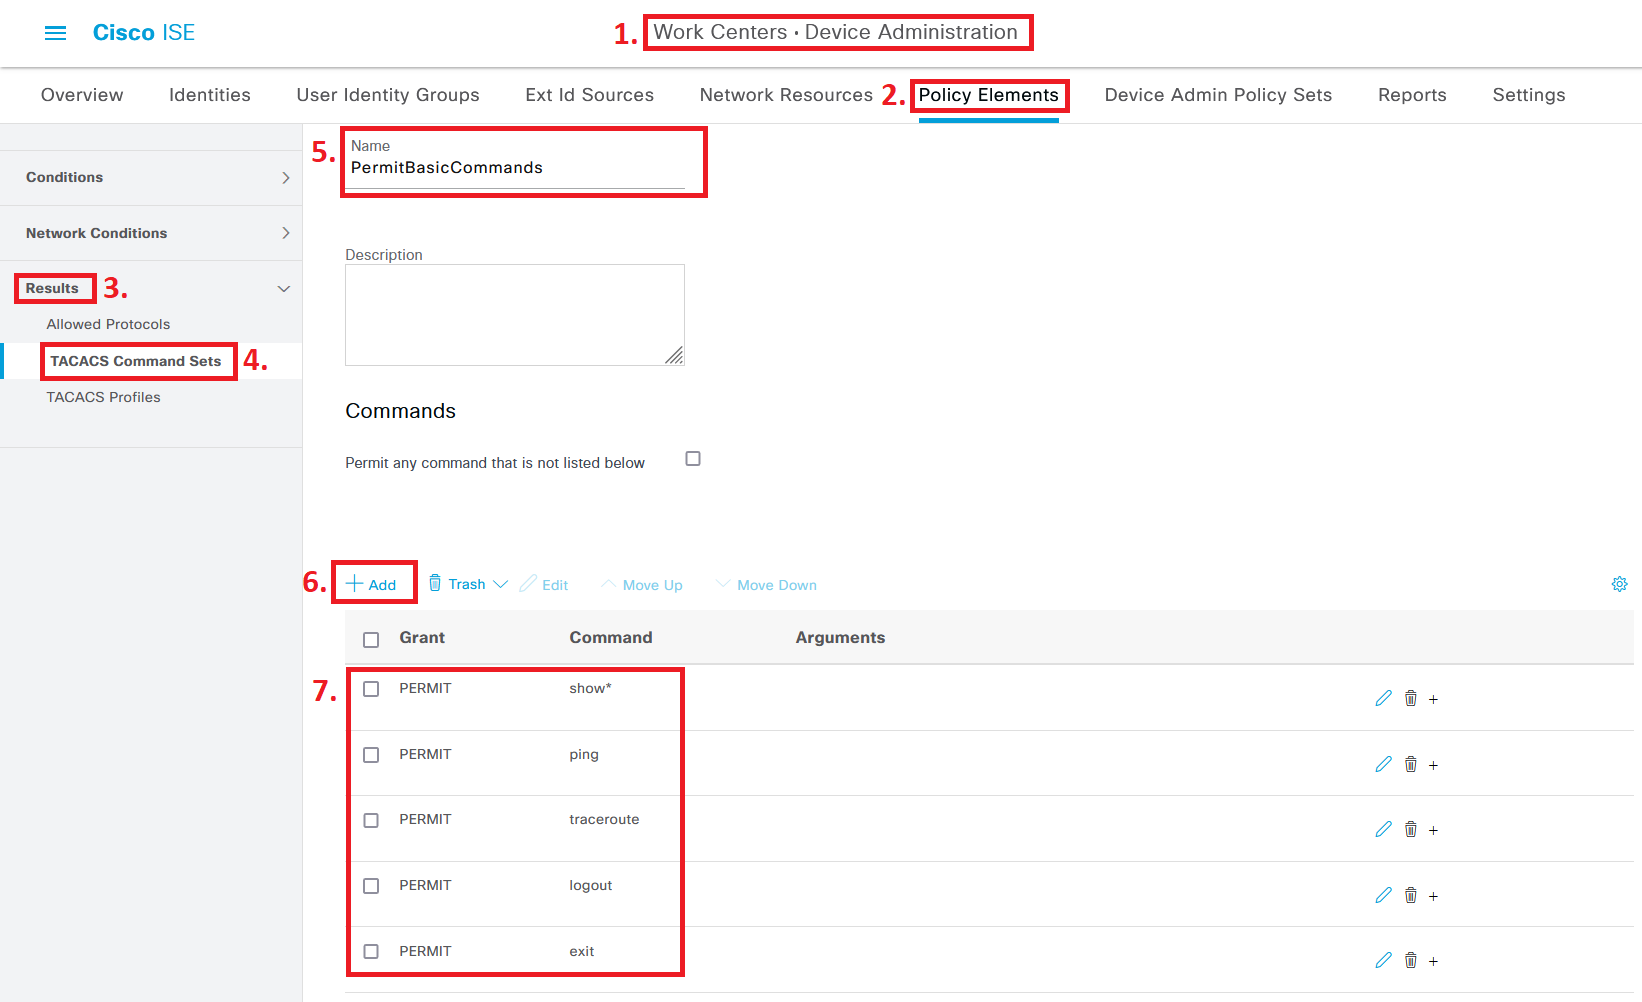
Figure 9 — PermitBasicCommands TACACS Command Set for Helpdesk accounts
After creating both Command Sets, your list should look like this:

Figure 10 — TACACS Command Sets overview with both entries listed
7. Configure the Device Admin Policy Set
Navigation Path
Work Centers > Device Administration > Device Admin Policy Sets
This is where everything comes together. Enter the Default Policy Set (or create a dedicated one for your device types if needed).
For Authentication Policy, use “All_UserID_Stores” to support both local ISE accounts and Active Directory accounts. This is worth thinking about: if your AD goes down and all your admins authenticate only through AD, you can end up locked out of every device. Having at least one local ISE account as a fallback is a good practice.
For Authorization Policy, create rules that match the Employee group and Helpdesk group, granting each the TAC_PROFILE_PRIV15 profile along with their respective Command Sets:
| Group / Condition | TACACS Profile | Command Set |
| ISE Employee group | TAC_PROFILE_PRIV15 | PermitAllCommands |
| ISE Helpdesk group | TAC_PROFILE_PRIV15 | PermitBasicCommands |
| AD group: LAN-ACCESS-ADM | TAC_PROFILE_PRIV15 | PermitAllCommands |
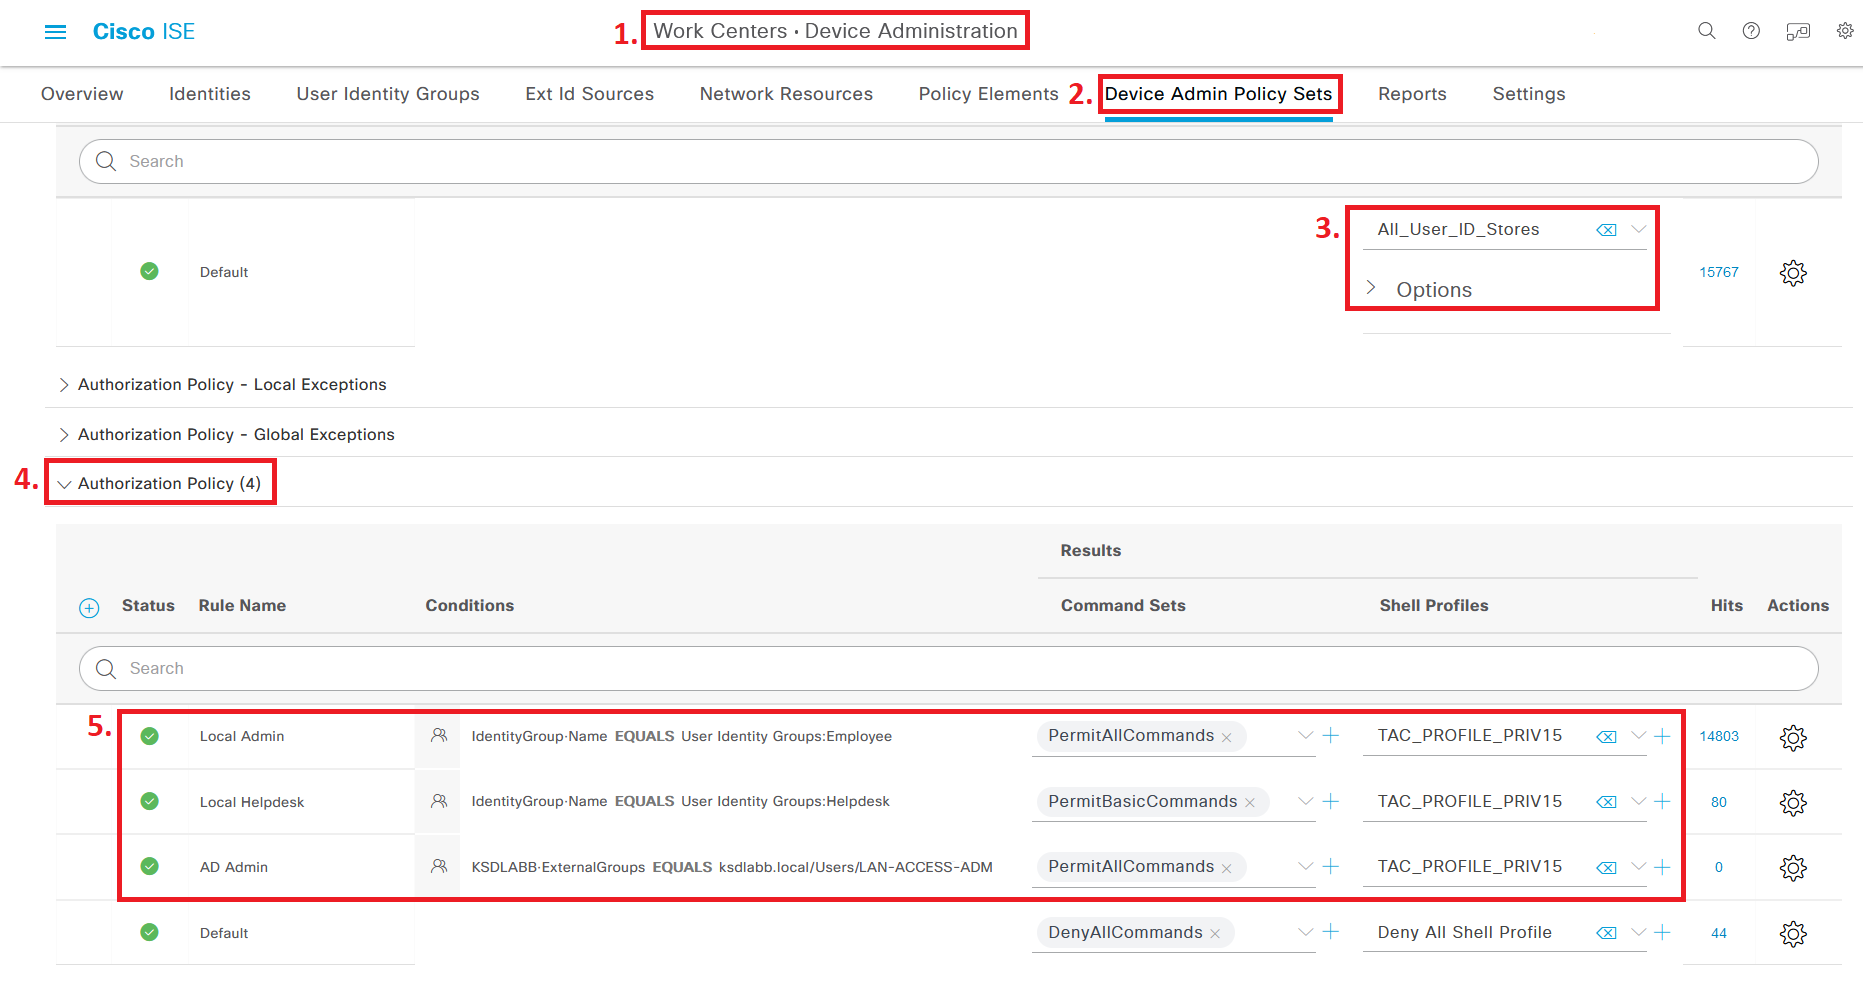
Figure 11 — Device Admin Policy Set showing Authentication and Authorization policies for all user groups
8. Switch / Router AAA Configuration
With ISE configured, the network device needs to be told to use TACACS+ for authentication and authorization. Below is a minimal working configuration for Cisco IOS and IOS-XE devices:
! Define the TACACS+ server tacacs server ISE-SERVER address ipv4 <ISE-IP-ADDRESS> key <SHARED-SECRET> ! Create a server group aaa group server tacacs+ ISE-GROUP server name ISE-SERVER ! Enable AAA aaa new-model ! Authentication aaa authentication login default group ISE-GROUP local aaa authentication enable default group ISE-GROUP enable ! Authorization aaa authorization exec default group ISE-GROUP local aaa authorization commands 15 default group ISE-GROUP local ! Accounting aaa accounting exec default start-stop group ISE-GROUP aaa accounting commands 15 default start-stop group ISE-GROUP ! VTY lines line vty 0 15 login authentication default authorization exec default transport input ssh ! Console line (local fallback) line con 0 login authentication default
Tip: For a more detailed breakdown of the console and VTY line configuration — including best practices around local fallback accounts and timeout settings — the article “Solid Config: Cisco AAA TACACS and Password Best Practices” on WIRES AND WI.FI covers it thoroughly. The commands above work on both IOS and IOS-XE.
9. Verification
Step 1 — Check TACACS Server Reachability on the Switch
Run this command on the switch to confirm ISE is reachable and active:
show tacacs | i Server
You should see the ISE server listed with the status “Alive”.
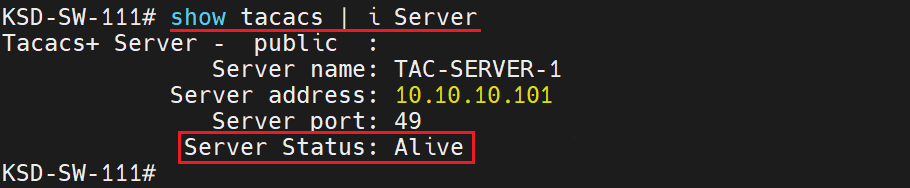
Figure 12 — Output of “show tacacs | i Server” confirming ISE server is Alive
Step 2 — Test Command Authorization
Log into the device as both an Administrator and a Helpdesk user. Try commands that should be blocked for Helpdesk. When ISE denies a command, the CLI returns:
Command authorization failed.

Figure 13 — Helpdesk user session showing allowed commands and denied command authorization
Step 3 — Review ISE TACACS Live Logs
Navigate to Operations > TACACS > Live Logs to see all authentication and authorization events processed by ISE. This is a separate log from the RADIUS Live Logs — make sure you’re in the right place.
✅ Successful command authorization (Administrator account)

Figure 14 — TACACS Live Log entry showing successful command authorization for Administrator
❌ Failed command authorization (Helpdesk account attempting unauthorized command)
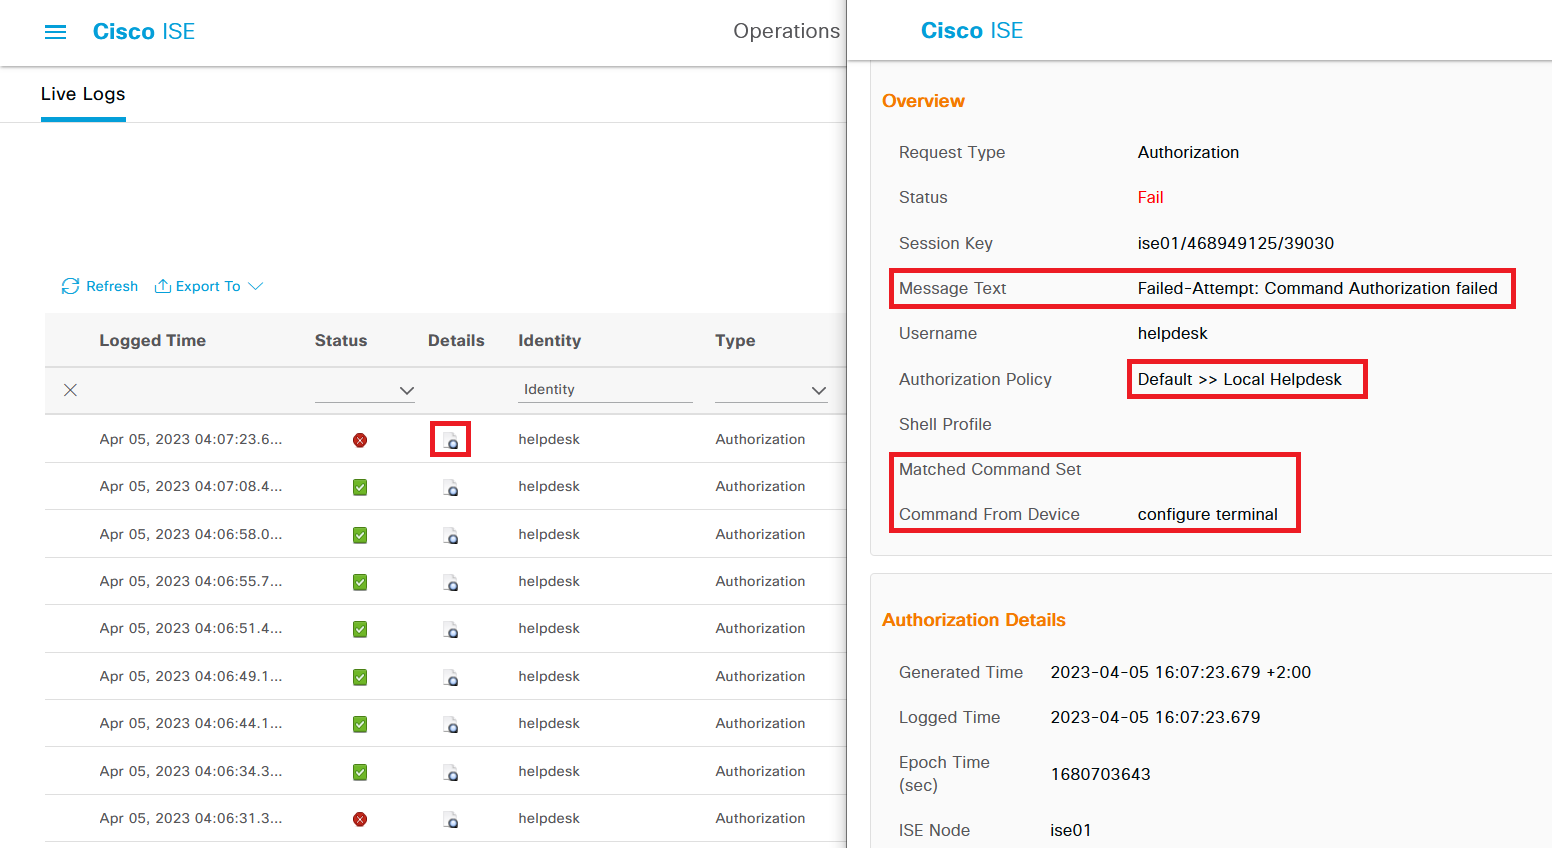
Figure 15 — TACACS Live Log entry showing failed command authorization for Helpdesk user
Configuration Checklist
| Step | Where in ISE |
| ☑ Enable Device Admin Service on PSN | Admin > System > Deployment |
| ☑ Configure TACACS+ Connection Settings | Work Centers > Device Admin > Settings |
| ☑ Add Network Device with Shared Secret | Admin > Network Resources > Network Devices |
| ☑ Create TACACS Profile (Priv 15) | Work Centers > Device Admin > Policy Elements > TACACS Profiles |
| ☑ Create PermitAllCommands Command Set | Work Centers > Device Admin > Policy Elements > TACACS Command Sets |
| ☑ Create PermitBasicCommands Command Set | Work Centers > Device Admin > Policy Elements > TACACS Command Sets |
| ☑ Configure Device Admin Policy Set | Work Centers > Device Admin > Device Admin Policy Sets |
| ☑ Configure AAA on Switch / Router | Device CLI (IOS / IOS-XE) |
10. Frequently Asked Questions
Why use TACACS+ instead of RADIUS for device administration?
TACACS+ separates authentication, authorization, and accounting into distinct processes. More importantly, it supports command-level authorization. RADIUS doesn’t do that natively. If you want to control exactly which CLI commands a user can run, TACACS+ is the right protocol.
What license does ISE need for TACACS+ device administration?
A Device Administration license is required, separate from the standard ISE Base or Mobility license. The Device Admin service won’t enable without it. Check your license status in ISE before starting the configuration.
Why set Helpdesk users to privilege 15 if they have limited access?
Some “show” commands require privilege level 15 to run — show running-config is one example. Setting the privilege to 15 for everyone and using Command Sets for the actual restriction is cleaner than trying to manage privilege levels per command. The Command Set is what does the real work.
Can TACACS+ and RADIUS be used at the same time on a Cisco device?
Yes. A common pattern is TACACS+ for device administration logins and RADIUS for 802.1X endpoint authentication. The AAA configuration on the switch specifies which protocol handles which type of authentication, so both can run side by side without conflict.
What happens if ISE goes down — do all device logins fail?
Only if you haven’t configured a local fallback. The AAA commands above include local as a fallback method, which means if ISE is unreachable, the switch will fall back to its local user database. Always keep at least one local account on the device with a strong password specifically for this scenario.
Where can I see which commands were denied in ISE?
Go to Operations > TACACS > Live Logs. Every authentication and command authorization attempt appears here, with the status (passed or failed), matched policy, and the specific command that was attempted. It’s separate from the RADIUS Live Logs.
Summary
TACACS+ in Cisco ISE gives you control that RADIUS doesn’t: you can decide exactly which commands an administrator is allowed to run, and ISE logs every attempt. The setup isn’t complicated once you understand the moving parts — Device Admin service, TACACS Profile, Command Sets, and Policy Set.
The most important operational detail is the fallback: always keep a local account on your devices and in ISE that bypasses the external identity store. External dependencies fail. When they do, you want a way back in.
Reference
Cisco Identity Services Engine Administrator Guide, Release 3.1 — Device Administration section.
Original article: wiresandwi.fi — Cisco ISE Configuring TACACS+ Authentication for Device Administration


